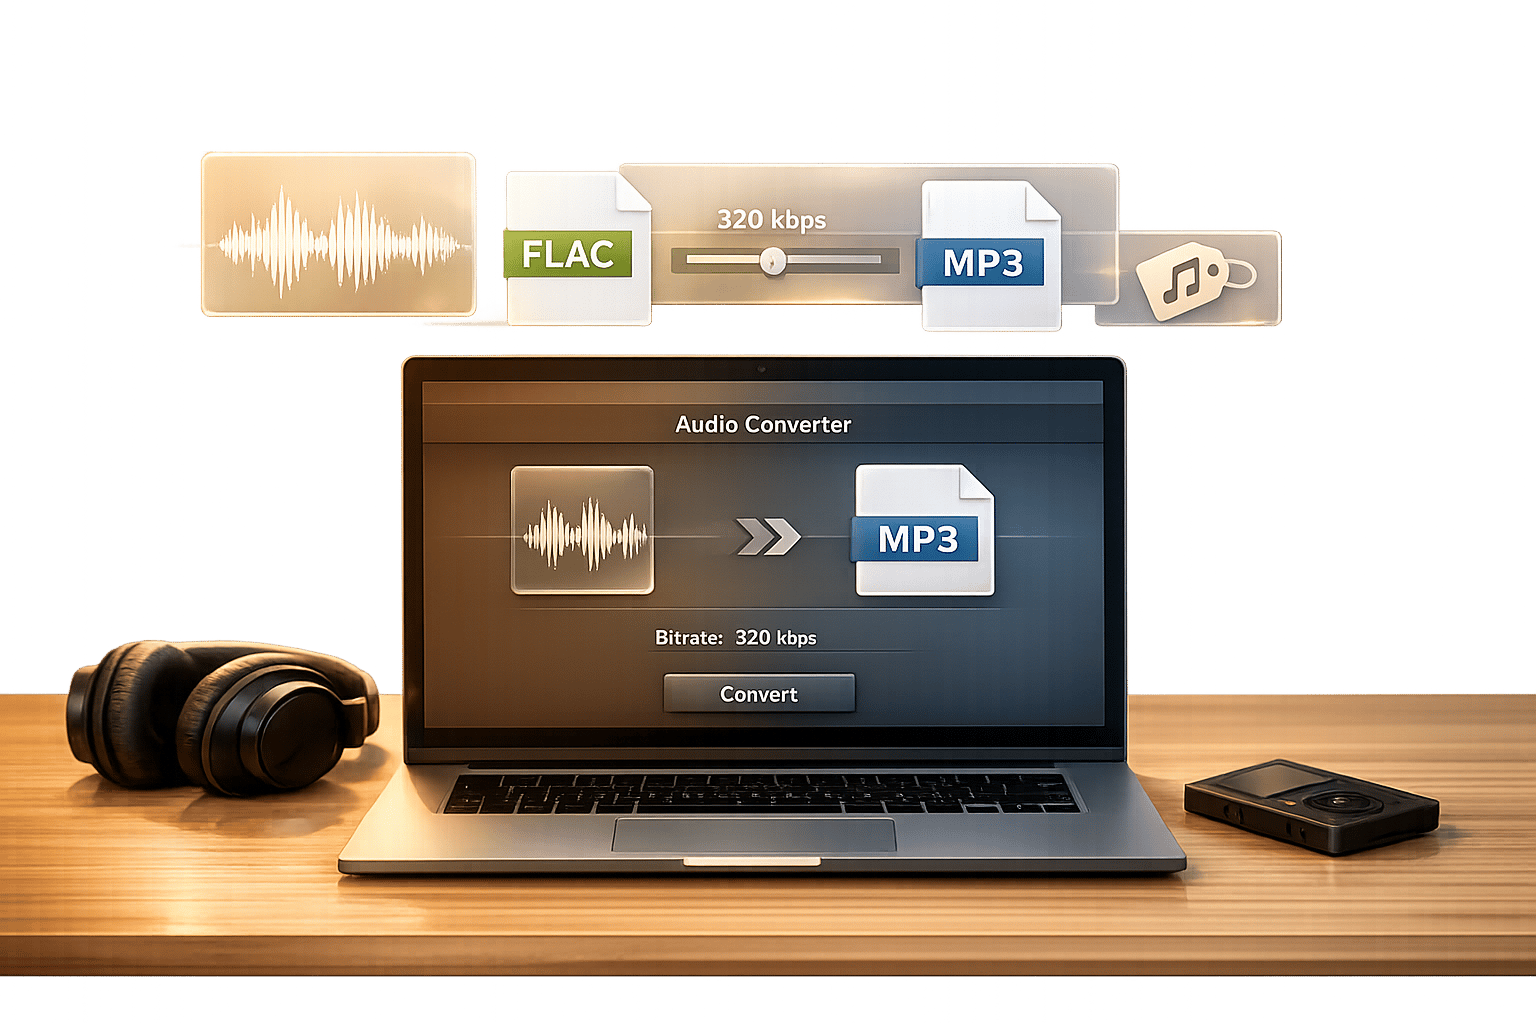
Converting Lossless Audio to MP3: Tips and Tricks
If you're tired of losing storage space to FLAC files, converting them to MP3 might be the solution you need. Here's why:
- Storage Savings: MP3 files are up to 90% smaller than uncompressed formats. For instance, 1,000 songs in 320kbps MP3 take up just 2.5 GB, compared to 25 GB in FLAC.
- Compatibility: MP3 works on nearly every device, unlike FLAC, which may need extra apps or updated hardware.
- Sound Quality: High-bitrate MP3 (256–320kbps) sounds almost identical to FLAC for casual listening.
To get the best of both worlds, keep a FLAC archive for quality and convert MP3 copies for portability. This guide explains how to convert files efficiently, choose the right bitrate, and preserve metadata for an organized library.
Convert Audio like a PRO: FLAC to MP3 and AAC in High Quality format with ffmpeg
Lossless vs. Lossy Audio Formats
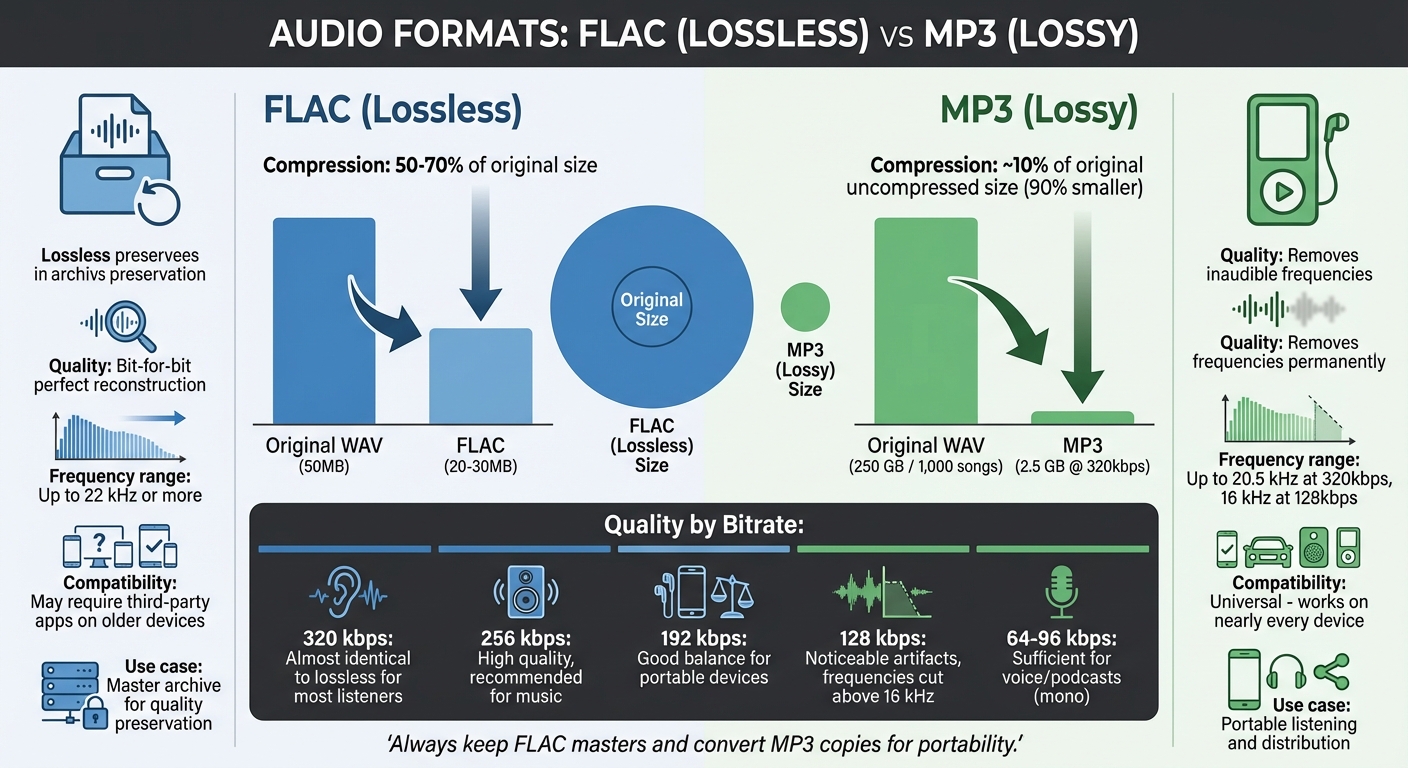
FLAC vs MP3 Audio Format Comparison: File Size, Quality and Compatibility
What is Lossless Audio?
Lossless audio formats, such as FLAC, function much like ZIP files for your music. They compress audio files to about 50–70% of their original size, but without sacrificing any data. When you play a FLAC file, your device reconstructs the audio bit-for-bit, preserving the original sound quality.
"FLAC stands for Free Lossless Audio Codec, an audio format similar to MP3, but lossless, meaning that audio is compressed in FLAC without any loss in quality." - Xiph.Org Foundation
For example, a 50MB WAV file can shrink to a 20–30MB FLAC file while retaining every bit of audio quality. FLAC also supports metadata, like artist names, album titles, and cover art, through Vorbis Comments.
On the other hand, MP3 takes a different approach by using lossy compression, which reduces file sizes even further but permanently removes some audio data.
What is MP3 and Why Convert?
MP3 compresses audio by removing frequencies that are typically inaudible to the human ear, significantly reducing file size while maintaining quality that's acceptable for most listeners. This process relies on psychoacoustic models to decide which data can be discarded. However, once audio is converted to MP3, the lost data cannot be recovered.
"Lossy-to-lossless is an oxymoron, because once subjected to lossy encoding, loss has occurred, and there's simply no way to undo it." - force_ken#4416, Transcoding Guide
The biggest advantage of MP3 is its small file size. A 320kbps MP3 file is roughly 10% the size of the original uncompressed audio. Additionally, MP3 is nearly universal - compatible with almost every device - while FLAC may require third-party apps on older hardware.
The quality of an MP3 file depends heavily on its bitrate. At 320kbps, most listeners won’t notice a difference between MP3 and lossless audio when using standard equipment. However, lower bitrates, such as 128kbps, cut off frequencies above 16 kHz, which can result in noticeable artifacts. High-quality MP3s at 320kbps can reproduce frequencies up to 20.5 kHz, while lossless formats typically extend to 22 kHz or more.
Choosing a Conversion Method
Finding the right tool to convert audio files is all about striking a balance between maintaining sound quality and keeping file sizes manageable. Once you're familiar with the differences between audio formats, the next step is deciding on the best conversion method for your needs.
Using Online Platforms like ConvertHub
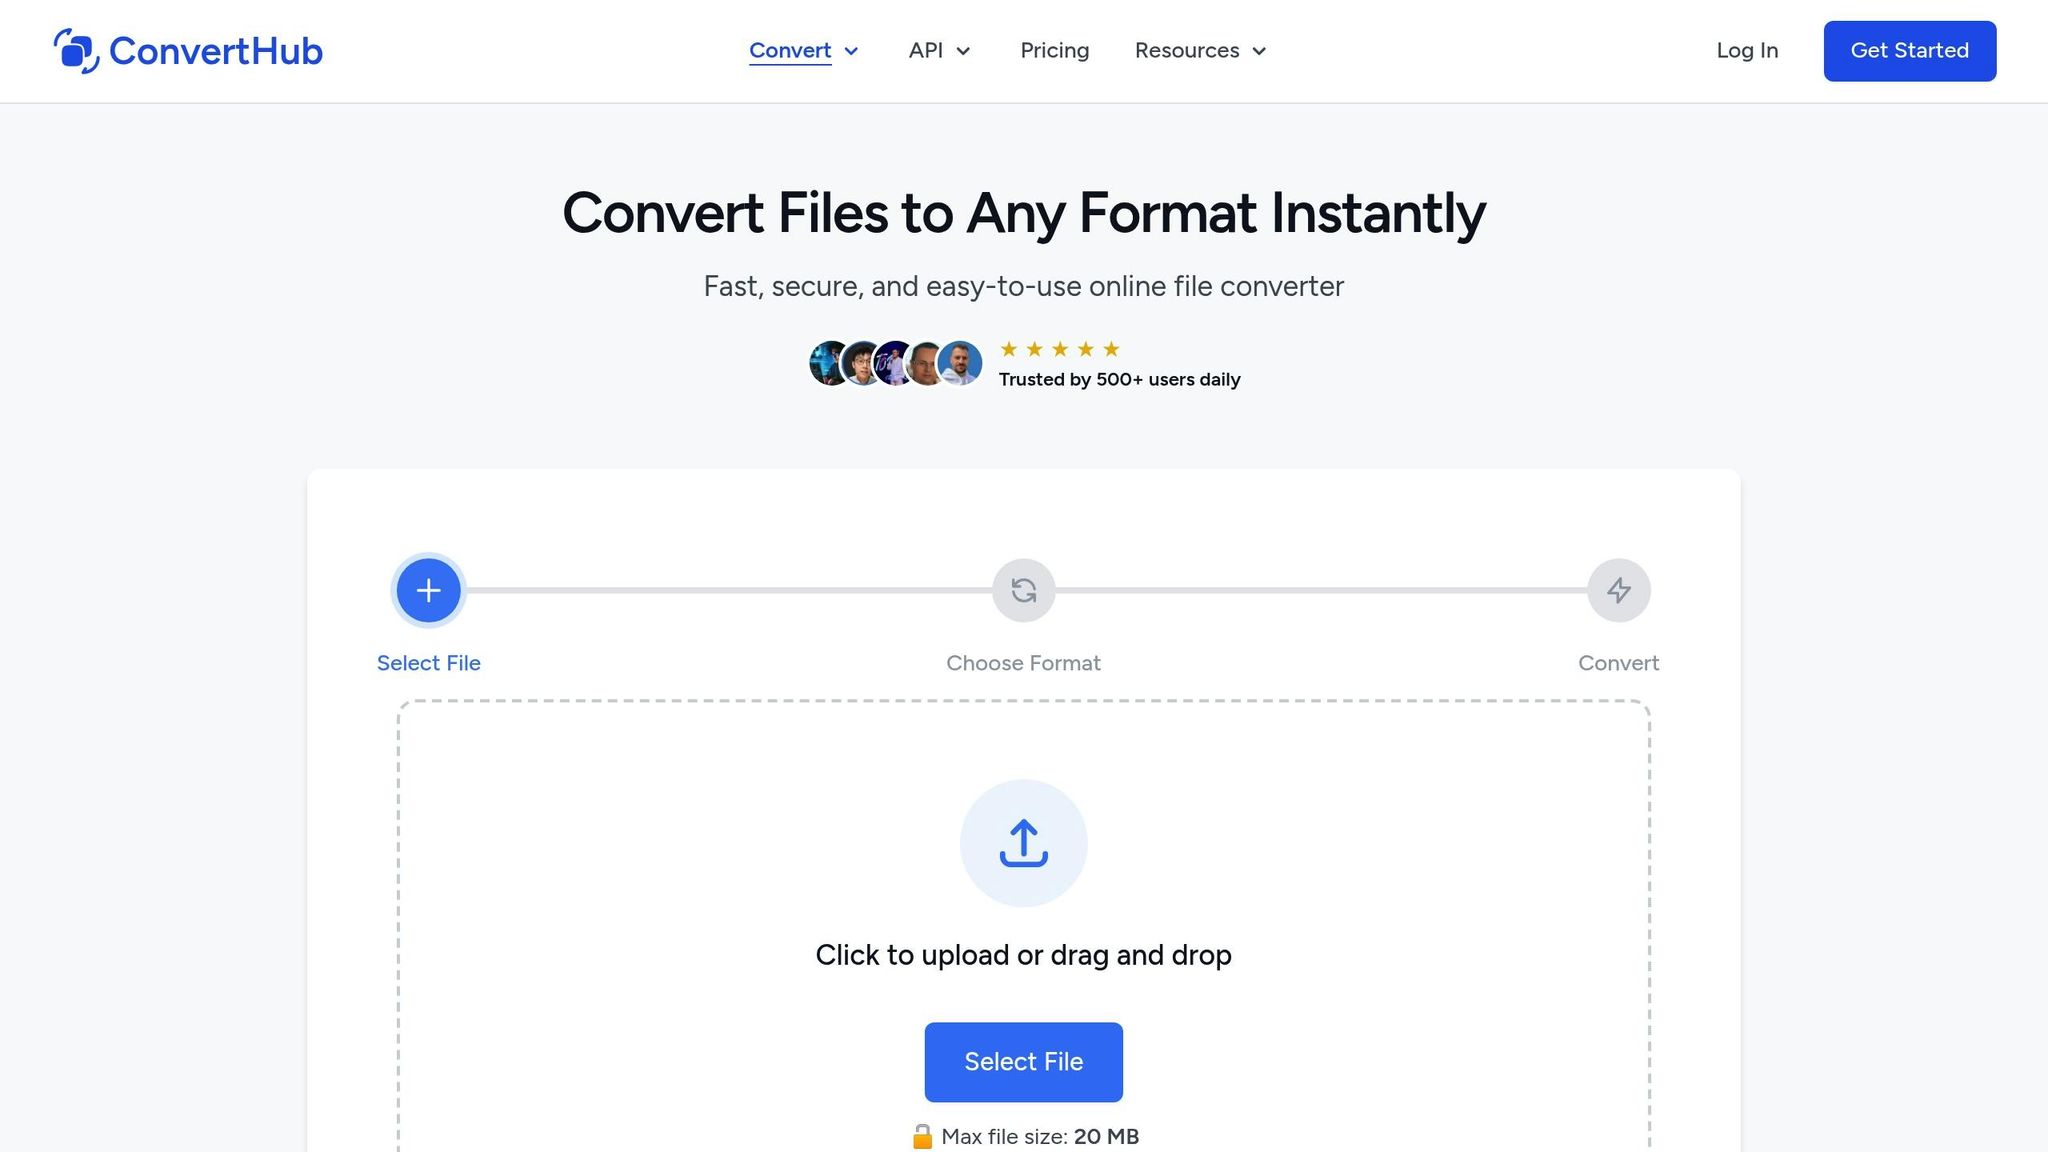
Online platforms make audio conversion simple - no downloads required. Just upload your file, and you're ready to go. Take ConvertHub, for example. It supports over 30 audio formats, including FLAC to MP3, and lets you tweak settings like bitrate and metadata for a more personalized result.
These platforms are incredibly versatile, working seamlessly on any modern browser, whether you're using Windows, macOS, Linux, or even ChromeOS. Plus, they offer integration with cloud storage services like Google Drive, Dropbox, and OneDrive, making it easy to import and export files without cluttering up your local storage.
ConvertHub allows free conversions for files up to 100MB, with premium plans available for larger files and batch processing. Some services even process files entirely in your browser for added privacy, though most upload your files to their servers and delete them within 24 hours.
However, there are a few drawbacks. Online tools often have file size limits - most free tiers cap files between 100MB and 250MB. And if you're trying to upload a large file, like a 500MB FLAC album, a slow internet connection can make the process frustratingly long.
Desktop Software vs. Online Tools
For those handling large audio libraries or massive files, desktop software like Audacity or foobar2000 is a better option. These programs can batch-convert files locally, with no restrictions on file size. Whether you're working with a 2GB uncompressed WAV file or an entire music collection, your only limitation is your computer's processing power.
"Online Audio Converter is best suited for individual files while Audacity is better for multiple files." – Jennifer Allen, Technology Writer
That said, desktop software does come with tradeoffs. You’ll need to install the program and keep it updated, and you're tied to the machine where it's installed. On the other hand, online tools let you start a conversion on one device and finish it on another - perfect for quick, one-off tasks or mobile use.
When it comes to speed, desktop tools generally have the edge. They can take advantage of multi-core processors for faster local processing, while online platforms rely on internet bandwidth and server availability. For single-file conversions, both methods perform similarly, but desktop software shines when processing entire libraries.
Balancing Audio Quality and File Size
Finding the right balance between audio quality and file size comes down to bitrate. Bitrate, measured in kilobits per second (kbps), directly impacts both the sound quality and the size of the audio file. Higher bitrates deliver richer sound but result in larger file sizes. MP3 compression, for instance, reduces file sizes by removing inaudible frequencies, shrinking uncompressed WAV files by 70% to 90%. Let’s dive into how bitrate settings influence this balance.
How Bitrate Settings Work
MP3 encoders manage bitrate using two main approaches: Constant Bitrate (CBR) and Variable Bitrate (VBR).
- CBR applies a fixed bitrate across the entire file. This ensures predictable file sizes and broad compatibility with devices, making it ideal for streaming .
- VBR, on the other hand, adjusts the bitrate dynamically. Complex audio sections - like orchestral arrangements or layered vocals - get more bits, while simpler parts, such as silence or solo instruments, use fewer .
"VBR (Variable Bitrate) usually sounds better than CBR (Constant Bitrate) at the same average bitrate".
This flexibility allows VBR to achieve higher perceived audio quality while keeping the average file size smaller compared to CBR. For instance, at 320 kbps - the highest MP3 quality - an hour of audio typically takes up around 150–160 MB. By comparison, FLAC files of the same duration are generally 2 to 5 times larger.
Now that we’ve covered encoding methods, let’s look at how to choose the right bitrate for different scenarios.
Bitrate Settings for Different Situations
The ideal bitrate depends on your specific needs. For high-quality music playback, 256–320 kbps or VBR levels V0–V2 are excellent choices, as most listeners find these settings almost indistinguishable from lossless formats . If storage space is a concern - like when using portable devices - 192 kbps or VBR level V4 strikes a good balance between sound quality and file size.
For voice content such as podcasts or audiobooks, lower bitrates like 96–128 kbps are sufficient. Additionally, converting voice-only audio to mono can cut file sizes by about 50% without affecting clarity . For example, a 20-hour audiobook at 64 kbps mono would take up approximately 576 MB.
To maintain the best quality, always keep a lossless master (e.g., FLAC or WAV) and convert to MP3 only for distribution. Avoid converting between lossy formats (like AAC to MP3), as this causes "generation loss", a process that further degrades quality . For streaming, CBR is often the better choice to prevent sudden bitrate spikes that could disrupt playback.
Understanding these bitrate options helps you make smarter decisions about audio quality and file size for your specific needs.
sbb-itb-ba72479
Keeping Metadata During Conversion
When you convert FLAC files to MP3, you're not just changing the audio format - you’re also transferring metadata. Metadata includes details like the artist, album, track number, and album art, which are crucial for keeping your music library organized and easy to navigate.
"This can be particularly helpful if you have a large music library and rely on metadata to organize and navigate your collection." - Krishna Rao Vijayanagar, Founder, OTTVerse
If you’re managing a significant music collection, preserving these tags is a must. Many conversion tools simplify this process by automatically organizing metadata into folders.
Common Metadata Formats
Metadata storage varies depending on the audio format. For instance, FLAC files use a system called Vorbis comments, while MP3 files rely on ID3 tags. Within MP3 files, there are two primary versions of ID3 tags:
- ID3v1: An older format that stores up to 128 bytes of basic information (like title, artist, album, and year) at the end of the file.
- ID3v2: A more advanced format stored at the beginning of the file, capable of holding additional data such as album art, lyrics, and BPM.
"ID3v2.3 is the most widely supported version, thus it's commonly used to ensure maximum compatibility with various media players." - Krishna Rao Vijayanagar, Founder, OTTVerse
Ensuring accurate mapping between these metadata systems is critical for a smooth conversion process.
How to Preserve Metadata
The simplest way to retain metadata during conversion is by using a tool that handles it automatically. For example, ConvertHub seamlessly transfers metadata - such as artist names, album titles, and track details - from FLAC to MP3 without requiring manual adjustments. This feature is especially helpful when working with large batches of files.
For those using command-line tools like FFmpeg, a bit more effort is needed. Use the following flags to preserve metadata:
-map_metadata 0: Copies metadata from the source file.-id3v2_version 3: Writes ID3v2.3 tags for broader compatibility.-write_id3v1 1: Adds ID3v1 tags for legacy support.
Once the conversion is complete, double-check your metadata using a tag editor or your favorite music player. This final step ensures that details like album art, artist names, and track numbers have been accurately transferred, helping you maintain a well-organized music library.
Converting Multiple Files at Once
If you’ve got a music library packed with hundreds - or even thousands - of FLAC files, converting them one by one isn’t just tedious; it’s practically impossible. That’s where batch conversion comes in. By applying consistent settings to entire folders, batch processing can handle large-scale conversions while you focus on other things.
Why Batch Processing Is a Game-Changer
Batch processing allows you to convert dozens, even hundreds, of files at the same time. Professional desktop software often takes advantage of multiple CPU cores, enabling faster encoding by processing several files simultaneously. Some high-performance tools can utilize more than seven CPU cores to manage large conversion queues efficiently.
For those who prefer not to install software, online platforms like ConvertHub also support batch conversion. However, if you’re dealing with an extensive library, desktop tools tend to be faster since they rely on your computer’s hardware instead of internet speed or server limitations.
Before diving into a full-scale conversion, it’s smart to test your settings on a smaller sample, like a single album. Play the converted files on various devices - earbuds, car speakers, or your home audio system - to make sure your chosen bitrate and settings sound great across the board. Once you’re satisfied, you can confidently process the rest of your collection. And when it’s all done, keeping your files organized is just as important as the conversion itself.
Keeping Your Folder Structure Intact
One downside of batch conversion is the potential disruption of your folder organization. Luckily, many converters include a "Preserve Source Path" option, which mirrors your original folder structure in the output location. So, if your FLAC files are neatly arranged as Artist > Album > Tracks, your converted MP3 files will follow the same structure.
Maintaining this organization is crucial for a clean and accessible library. Dynamic naming features can help by automatically renaming and organizing files using metadata tags like [artist], [album], and [track number]. To avoid any accidental overwrites, always save your converted files in a separate output folder. This way, your original lossless files remain untouched, and your new library is easy to navigate.
Conclusion
Converting lossless audio to MP3 is easier than you might think, as long as you pay attention to a few important details. Always start with a lossless source like FLAC, WAV, or AIFF. Why? Because converting from a lossy format can lead to even more audio quality loss - something you definitely want to avoid. Keep those lossless files as your master copies for future use.
When it comes to choosing the right bitrate, it's all about finding the perfect balance between quality and file size. For most music lovers, 256 kbps with Variable Bitrate (VBR) strikes that balance beautifully. If you're using standard equipment, even 320 kbps can sound almost identical to lossless audio. VBR is a smart choice because it adapts data usage, delivering excellent quality without bloating file sizes, unlike Constant Bitrate (CBR). On the other hand, for voice recordings like audiobooks, switching to mono at 64–96 kbps can significantly cut file size while keeping the audio clear.
Don't forget about metadata - it’s a small detail that makes a big difference. Tools that support ID3v2.3 tags ensure that your artist names, album titles, and even cover art are automatically preserved, saving you from the hassle of manual re-tagging. If you're converting a large collection, batch processing can save you hours. Just remember to test your settings on a few files first and enable options to maintain your folder structure.
FAQs
What are the best ways to batch convert FLAC to MP3?
For converting FLAC files to MP3 in batches, there are several dependable tools available, catering to different levels of technical expertise and preferences. Here are some popular choices:
- LameXP: A free Windows application with an easy-to-use interface. It employs the LAME encoder, making it efficient for processing entire folders of files.
- FFmpeg: A versatile command-line tool that gives you complete control over settings like bitrate and audio quality, making it perfect for large-scale, customizable conversions.
- fre:ac: An open-source converter compatible with both Windows and Linux. It supports multithreaded processing, ensuring faster conversions, and preserves metadata throughout the process.
For those who prefer an online option, ConvertHub provides a straightforward and secure way to batch convert FLAC to MP3. With drag-and-drop functionality, automatic processing, and no need for software installation or registration, it’s a convenient choice for quick conversions, even for extensive music libraries.
How can I keep metadata intact when converting lossless audio to MP3?
When converting lossless audio files like FLAC to MP3, keeping metadata intact - such as artist details, album name, track number, and cover art - is crucial. To achieve this, you need a tool or method that supports metadata transfer. For example, FFmpeg offers a reliable solution. By using the -map_metadata 0 option, you can copy all metadata from the original file, and the -id3v2_version 3 option ensures compatibility with most MP3 players. Here’s an example command:
ffmpeg -i audio.flac -ab 320k -map_metadata 0 -id3v2_version 3 audio.mp3
If you prefer a simpler approach, tools like ConvertHub’s online audio converter handle metadata retention automatically. This way, your MP3 files will include all relevant tags without requiring extra configuration. Once the conversion is complete, it’s worth checking the MP3 tags using a tag editor or your media player to confirm that everything transferred as expected.
What’s the best bitrate for balancing audio quality and file size when converting to MP3?
For an ideal mix of audio quality and manageable file size, a variable bitrate (VBR) set to target around 256 kbps is a solid choice for most music. If you're dealing with spoken-word content, you can go for a lower bitrate, like 192 kbps, and still retain clear audio.
VBR works by adjusting the bitrate dynamically to match the complexity of the audio. This means you get efficient compression while preserving the quality where it matters most. It's a smart way to keep file sizes reasonable without compromising the listening experience.