
How to Batch Convert Images Without Losing Quality
Batch image conversion can save you time while preserving quality. Whether you're a photographer, web designer, or e-commerce manager, tools like ConvertHub simplify this process by supporting over 800 formats, offering lossless options like PNG or WebP, and retaining metadata.
Key points:
- ConvertHub Features: Drag-and-drop uploads, lossless options, and batch processing for up to 100 files or 500MB in a single go.
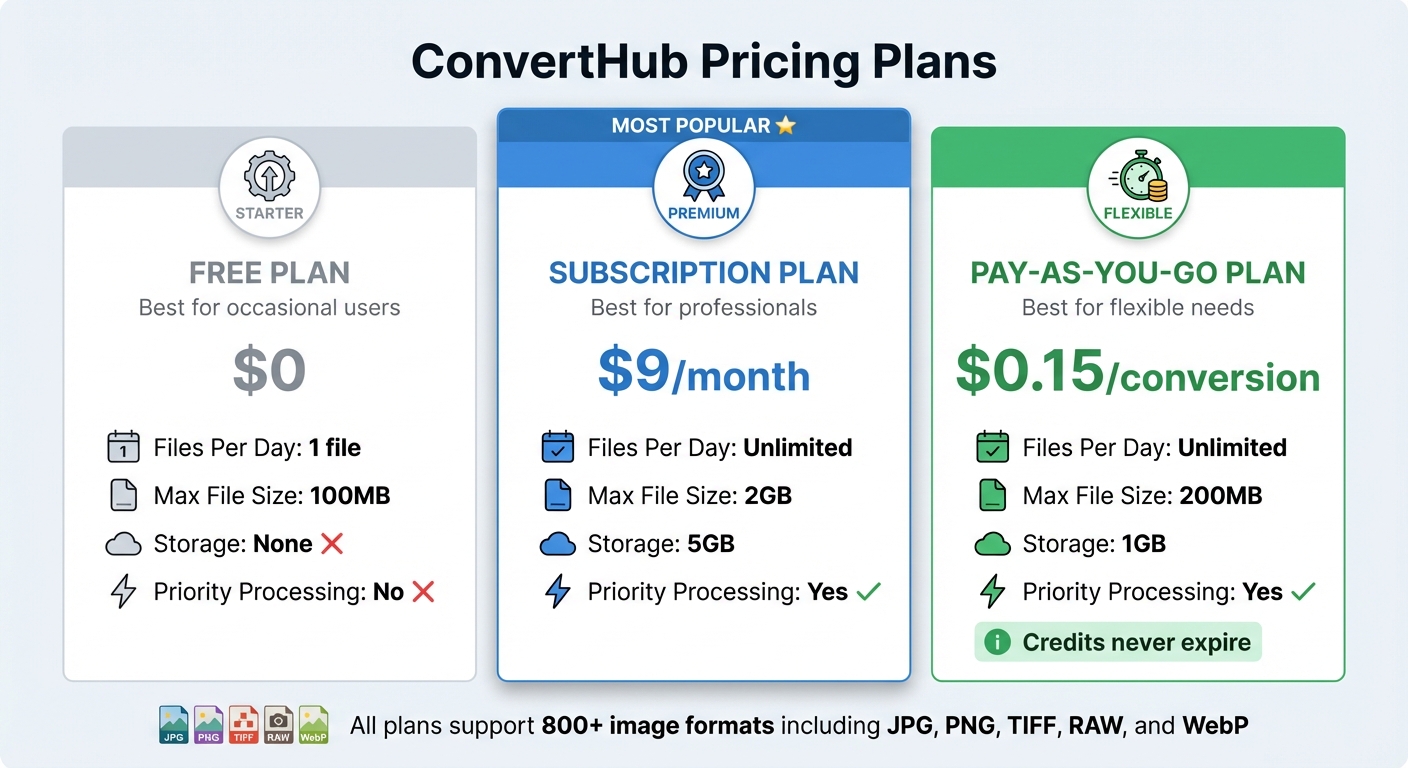
- Plans: Free (1 file/day, 100MB limit), Subscription ($9/month, 2GB files, unlimited conversions), and Pay-as-You-Go ($0.15/conversion, 200MB limit).
- Settings: Adjust quality sliders, retain metadata, and choose formats wisely (e.g., PNG for detail, WebP for smaller sizes).
Quick Tip: Test a small batch before large conversions to ensure settings meet your needs.
Learn how to streamline your workflow and maintain image quality with detailed steps and settings.
Batch convert your photos files | TIFF | JPEG | JPEG
Why Use ConvertHub for Batch Image Conversion
ConvertHub makes converting multiple images quick and simple without sacrificing quality. It supports an impressive range of over 800 formats - including JPG, PNG, TIFF, RAW, and WebP - so you won’t run into compatibility issues.
The platform is easy to use, offering drag-and-drop functionality, URL pasting, or direct file uploads. For straightforward conversions, you don’t even need to create an account. These user-friendly features seamlessly lead into ConvertHub’s powerful conversion tools, which are outlined below.
ConvertHub Features
ConvertHub is built for efficient batch processing. On the free plan, you can convert files up to 100MB - perfect for most everyday tasks. If you’re dealing with larger files or need more frequent conversions, the subscription plan handles files up to 2GB and offers priority processing, so your files get converted faster.
Registered users gain access to a conversion history, making it easy to revisit and redownload past batches. The subscription plan also includes 5GB of storage for your converted files, while the pay-as-you-go option provides 1GB of storage for added flexibility.
ConvertHub Pricing Plans
ConvertHub Pricing Plans Comparison: Free vs Subscription vs Pay-as-You-Go
ConvertHub has three pricing options tailored to different conversion needs. The Free Plan allows you to convert one file (up to 100MB) per day without needing to sign up - perfect for those who only need occasional conversions. The Subscription Plan, priced at $9 per month, removes all daily limits and supports unlimited conversions of files up to 2GB. It also includes priority processing and 5GB of storage for your converted files. For those who need flexibility, the Pay-as-You-Go Plan charges $0.15 per conversion. Credits never expire, and it supports files up to 200MB with 1GB of storage included.
| Plan | Price | Files Per Day | Max File Size | Storage | Priority Processing |
|---|---|---|---|---|---|
| Free | $0 | One | 100MB | None | No |
| Subscription | $9/month | Unlimited | 2GB | 5GB | Yes |
| Pay-as-You-Go | $0.15/conversion | Unlimited | 200MB | 1GB | Yes |
This straightforward comparison helps you pick the plan that fits your conversion needs.
How to Choose Your Plan
Think about how often you’ll need to convert files. If you only convert a handful of files each month, the free plan might be enough, but its one-file-per-day limit could slow you down if you’re converting more than seven files a week. For regular, high-volume users - like photographers, designers, or anyone processing over 60 files a month - the subscription plan is a better fit. At $9 per month, it’s a solid option for consistent usage.
For those with unpredictable conversion needs, the pay-as-you-go option is a great choice. Since credits never expire, it’s perfect for freelancers or businesses that operate on a project or seasonal basis.
File size is another key factor. If you’re dealing with large, high-resolution RAW files or TIFF images, you’ll likely exceed the 100MB limit of the free plan. The subscription plan’s 2GB cap can handle even the largest professional files, while the pay-as-you-go plan’s 200MB limit works well for most standard photography and design tasks.
How to Batch Convert Images with ConvertHub
Step-by-Step Instructions
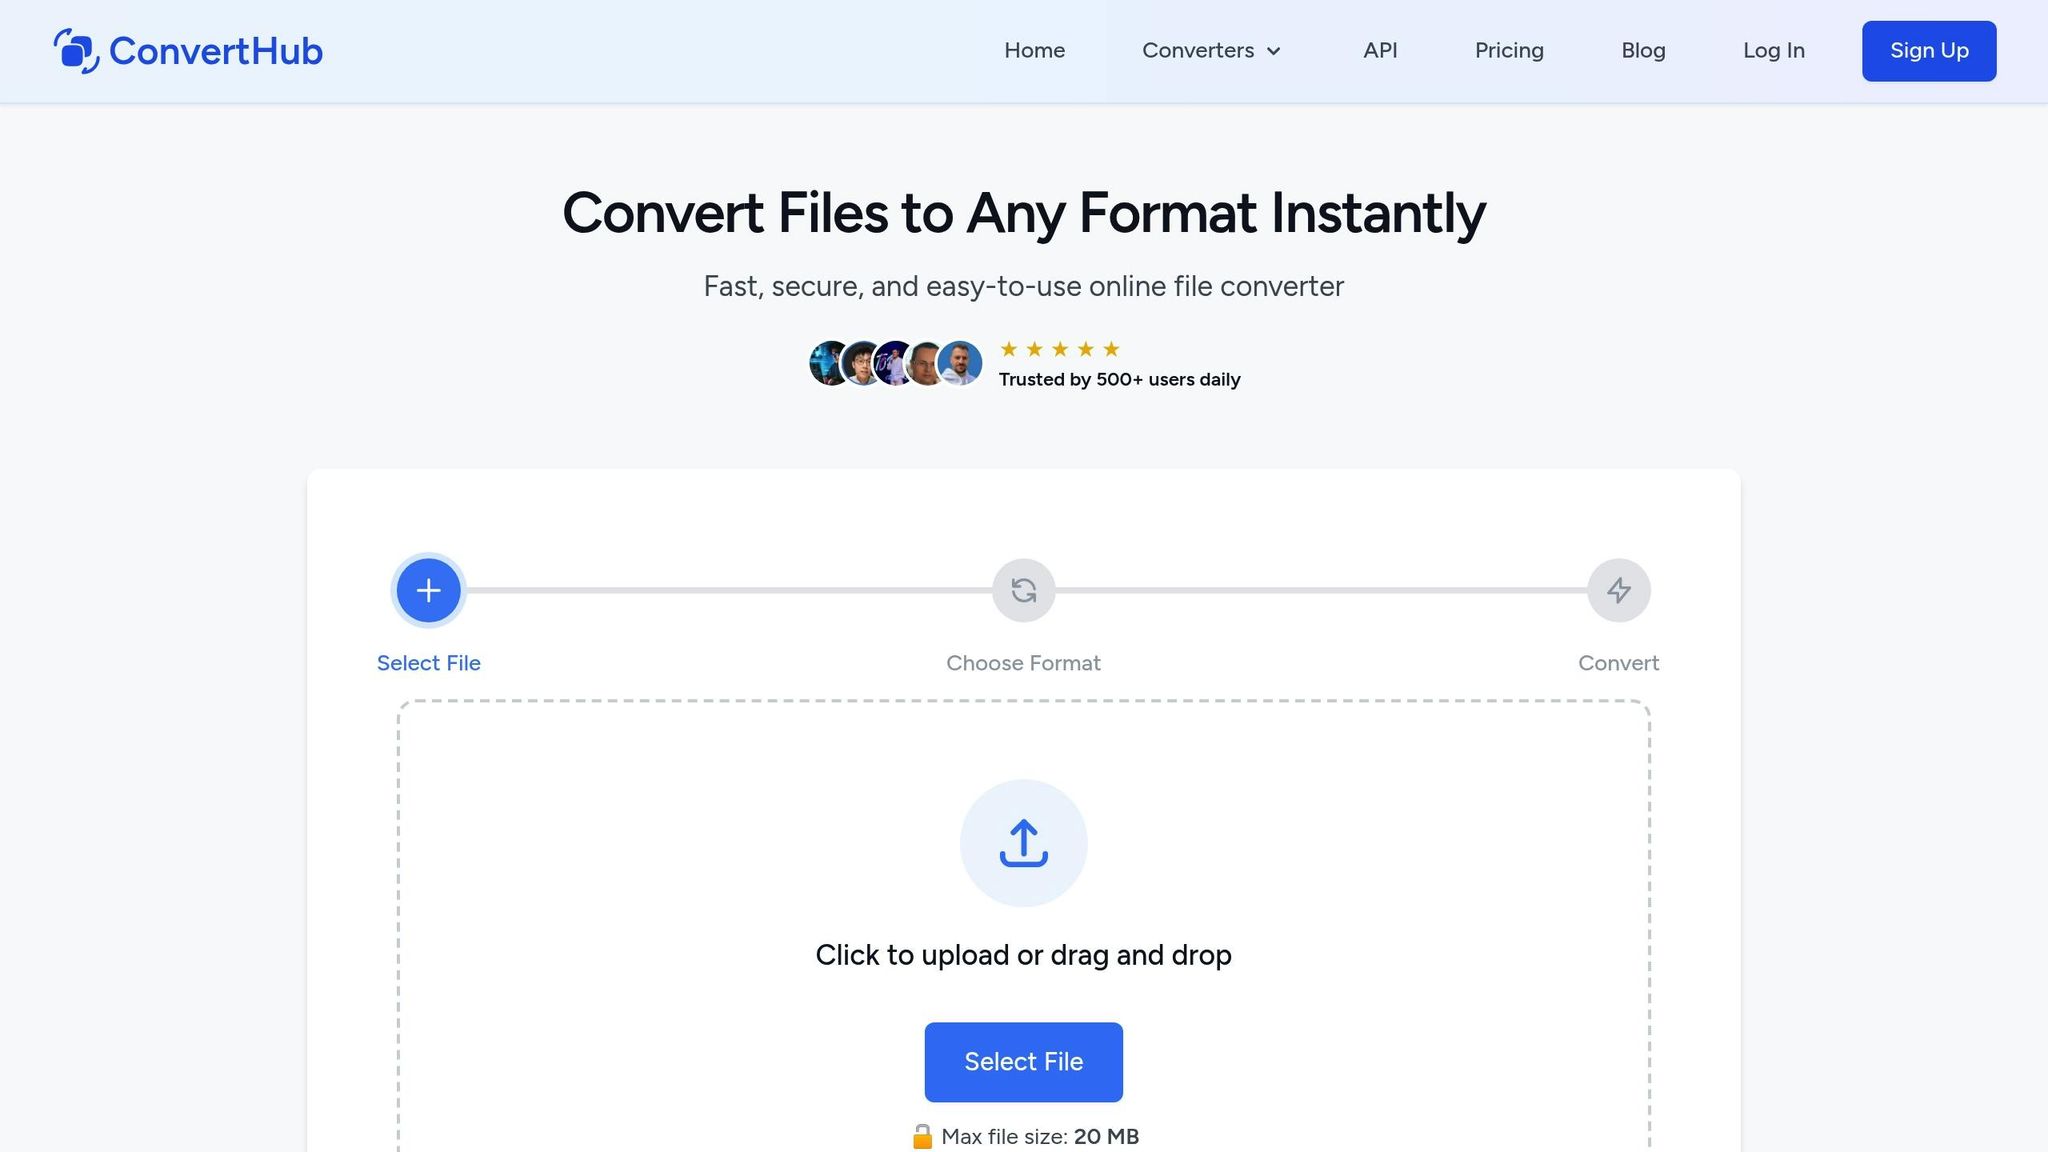
Head over to converthub.com and either drag your image files into the upload area or click to browse and select them. ConvertHub allows you to process up to 100 files or a total of 500MB in one batch. If you’re working with images hosted online, you can simply paste their URLs.
Once your files are uploaded, choose the output format that works best for your needs. For lossless quality, go with PNG - it retains every detail without adding compression artifacts. If you’re aiming for smaller file sizes without sacrificing too much quality, WebP is a great option. Adjust the quality slider to 100% for the best results. You can also check options to preserve the original resolution and retain metadata like EXIF data.
When you’re ready, click "Convert." ConvertHub processes everything in the cloud, and you can track progress with a handy indicator showing how many files are done. Once the process is complete, you can download all your converted images in a single ZIP file. Rest assured, your files are automatically deleted from ConvertHub’s servers after 24 hours to ensure privacy.
Tips for Better Results
- Sort your images by format and start with a small test batch of 5–10 images. This lets you confirm your settings and avoid issues when converting larger groups.
- Use a stable and fast internet connection (at least 50Mbps) to prevent upload delays, especially for high-resolution images near the 500MB limit.
- If you’re working with a large number of files, split them into smaller batches. This helps streamline the process and allows you to download completed batches while others are still being processed.
sbb-itb-ba72479
Settings to Prevent Quality Loss
Choosing the Right Format
Selecting the right file format is crucial for maintaining image quality during batch conversions. Lossless formats like PNG and TIFF are excellent choices because they retain all details during compression. TIFF, in particular, is a go-to option for professional photography and high-resolution printing due to its ability to preserve intricate details, though it does result in larger file sizes.
If you're looking for a versatile format, WebP is worth considering. It supports both lossless and lossy compression, handles transparency and animation, and significantly reduces file sizes. However, be cautious when converting from a lossless format (like PNG) to a lossy one (such as JPEG), as this will inevitably lead to some loss of information.
Making the right format choice lays the groundwork for effective compression and helps maintain metadata during batch processing.
Quality and Compression Settings
Fine-tuning compression settings is the next step in preserving image quality. For lossy formats like JPEG, tools such as ConvertHub offer a quality slider that lets you control the balance between file size and detail. Setting the quality to 100% minimizes compression, preserving as much detail as possible, though it does result in larger files. Keep in mind that lossy formats inherently discard some data to reduce file size, so the aim is to minimize visible quality loss rather than eliminate it entirely.
For formats like PNG or BMP, adjust the color depth to 24-bit or 32-bit to ensure accurate color representation. Using an 8-bit setting can limit the color palette, which may compromise image quality.
Keeping Metadata and Resolution
After selecting the format and optimizing compression, focus on retaining essential details. Ensure that your images keep their original resolution and EXIF metadata. This metadata includes camera settings, capture dates, and location details, which can be important for documentation or editing purposes. Preserving the original resolution ensures that every pixel contributes to the final output, maintaining the integrity of your images.
Advanced Batch Conversion Features
Presets and Automation
If you frequently handle similar conversions, presets can save you a ton of time. With ConvertHub, you can create and save presets that cover everything - output format, quality, resizing, and even specific processing actions. Plus, automation takes it a step further. Features like Watch Folders and command-line scripting allow conversions to happen automatically, so you can set it and forget it.
Processing Large Batches
Handling massive image batches can be daunting, but ConvertHub makes it surprisingly manageable. By leveraging automated presets, this tool ensures that even large volumes of images are processed efficiently. ConvertHub’s advanced features prioritize quick conversions while maintaining consistent quality, no matter the batch size. Whether you’re working with hundreds or thousands of images, you won’t have to worry about slowdowns or quality dips.
Conclusion
Batch converting images doesn't mean you have to compromise on quality. This guide has shown how ConvertHub makes the process simple and efficient, from selecting the right formats to fine-tuning compression settings and using advanced tools like presets and automation. Choosing formats like PNG for lossless quality, JPEG for a balance between size and clarity, or WebP and JPEG XL for excellent compression ensures your images retain their visual appeal.
With ConvertHub, you have access to detailed quality controls and automation tools that make processing any batch size - whether a few files or thousands - straightforward and reliable. You can adjust settings like compression levels, resolution, dimensions, and metadata retention to ensure your images stay sharp and professional. The platform's smart compression algorithms shrink file sizes while preserving image clarity.
On top of that, ConvertHub’s automation features save time and effort. Once you’ve set your preferred configurations, you can save them as presets. From there, ConvertHub takes over, ensuring every batch is processed consistently, without the need for repetitive adjustments.
FAQs
How can I keep my image metadata when converting formats?
When converting images, it's important to use tools that support keeping metadata intact. Look for settings like "Preserve Metadata" or similar options in the software you choose. Many professional tools, such as Adobe Photoshop, offer features to maintain details like camera settings, location data, and timestamps. Before starting the conversion, double-check these settings to ensure no metadata is lost in the process.
Why should I use lossless formats like PNG when converting images?
Using lossless formats like PNG ensures that every bit of the original image data remains intact during conversion, so there’s absolutely no drop in quality. This makes them a go-to choice for tasks where preserving visual detail is crucial, such as professional photo editing, high-quality storage, or printing.
Another advantage of lossless formats is their ability to handle repeated edits or conversions without any decline in quality. While they do tend to require more storage space compared to lossy formats, the extra space is a small price to pay when image clarity is a top priority.
How does ConvertHub make batch image conversions fast and easy?
ConvertHub makes batch image conversion a breeze with its fast processing speeds and compatibility with a variety of formats. Its user-friendly interface allows you to upload images, adjust settings, and convert multiple files all at once - quickly and effortlessly.
What sets ConvertHub apart is its built-in tools for automatic resizing, editing, and optimization. These features help preserve your images' quality while streamlining the process. Whether you're working with a handful of images or managing a larger workload, ConvertHub is built to save you time and deliver top-notch results.